No MSG! No added sugar! No Y-seams!
Have you ever seen a label that protests too loudly about something that is NOT inside the package, and stopped to wonder if it’s just marketing or if the thing that’s being left out is REALLY worth avoiding?
I don’t know about you, but I LOVE anything with MSG in it. (BBQ flavor potato chips? Instant ramen? Bouillon cubes? Yes please!) I’m pretty sure I was born addicted to it, actually. But this is a quilting blog, not a food blog.
Of all the piecing techniques that strike fear into the hearts of quilters, I think that Y-seams are the most misunderstood. So let’s take a closer look at what they are.
What is a Y-Seam?
Put simply, a Y-seam is when 3 (or more) seams come together and they DON’T make a right angle.

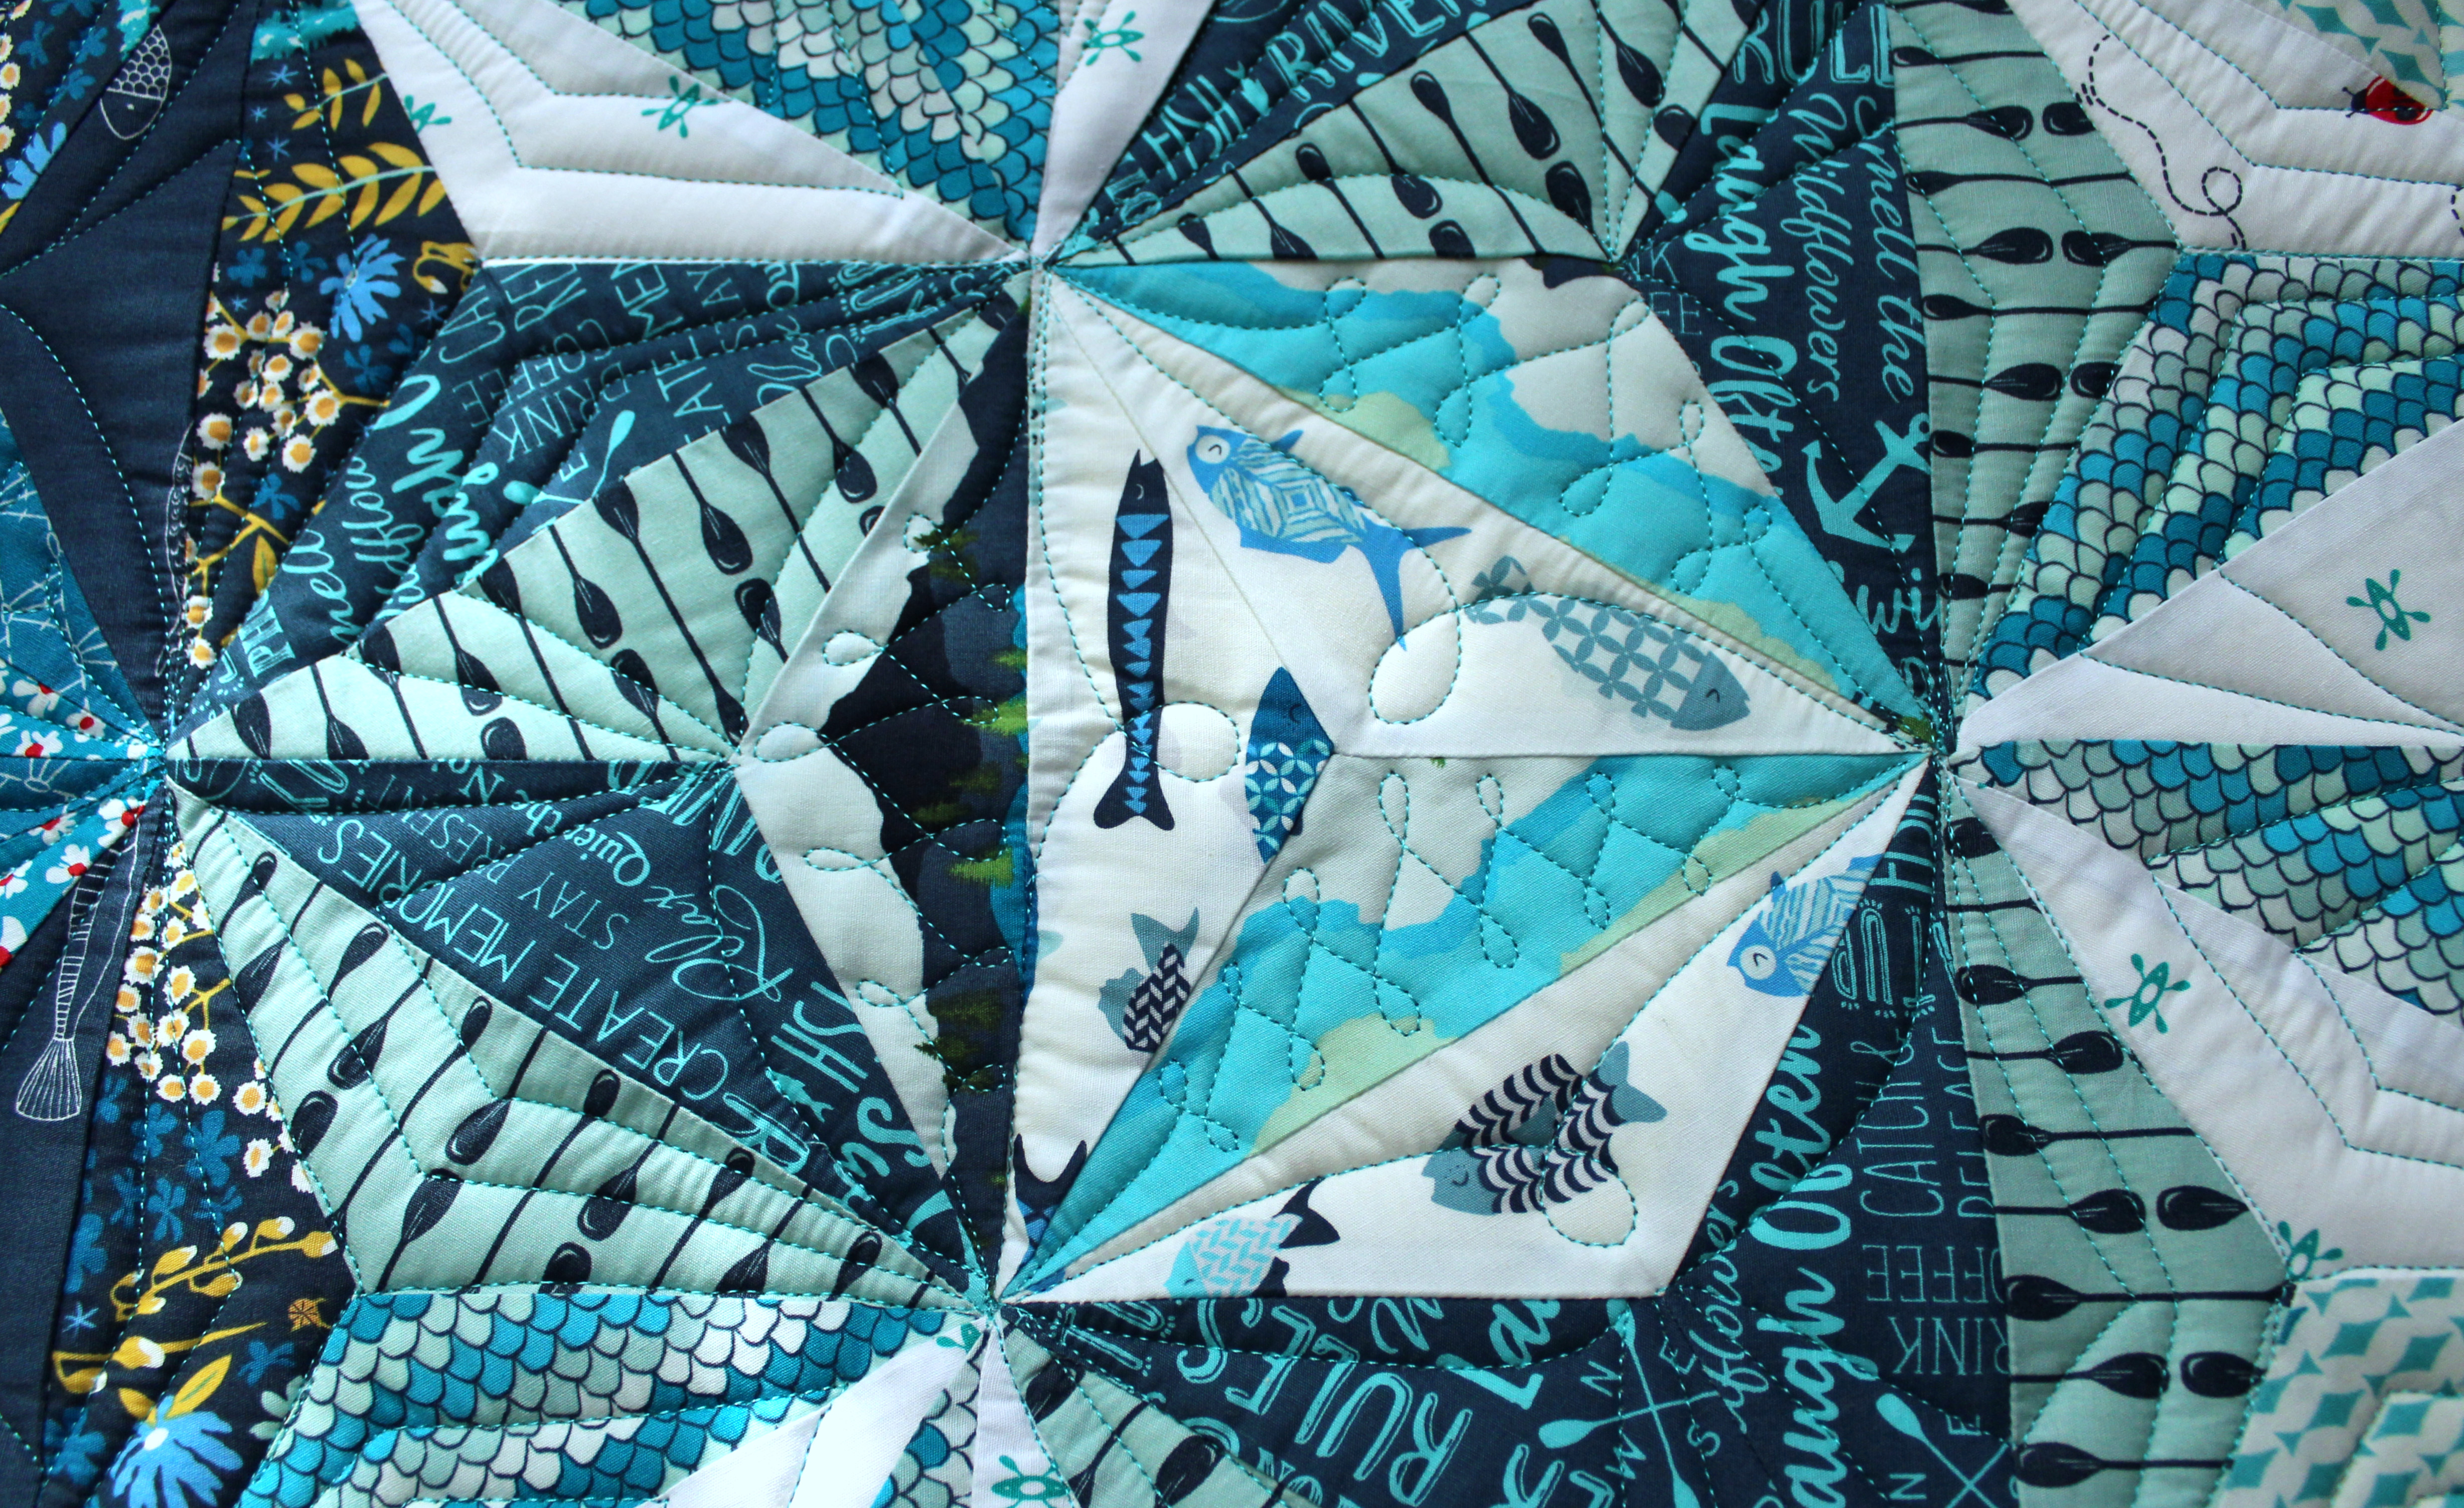
This lovely baby quilt made from Mister Domestic‘s Catch and Release collection for Art Gallery Fabrics is made with my Intersectional pattern. And yes, it requires Y-seams to make this optical illusion of intersecting three-dimensional facets.
Y-seams are often confused with their mild-mannered cousin, the partial seam. (There’s really truly nothing scary about the partial seam. You’ve probably done them many times without blinking an eye. But that’s a topic for another post.)
What’s so bad about Y-seams?
Y-seams do take more concentration and precision than regular, straight 1/4″ seams. You can’t speed through them and blindly chain piece, so if you like your sewing with a side of Netflix or a glass of wine, save the Y-seams for a more focused stitching session when you’re less likely to plough through a stop sign.
How to sew Y-seams
The first key to successful Y-seams is knowing where to stop your needle.

In this example, we have three diamonds coming together in the middle of a hexagon block. All three seams need to end at the same point — 1/4″ in from the edge of the fabric. To find the landmark, you can:
- Draw a line 1/4″ in from each edge, showing where your seams will go.
- The intersection of the two lines is where you need to start or stop your needle.
But you don’t want to do that for every seam, and I don’t blame you. Alternatively, you can:
- Fold the corner of the piece, matching the raw edges.
- The intersection of your 1/4″ seam and the crease is where you need to start or stop your needle.

The second key to successful Y-seams is actually being able to stop your needle in the right spot.
To help you with this, you can set up your sewing machine:
- Use a smaller gauge needle (70 or 80 works better than 90)
- Decrease your stitch length to a length that won’t overshoot your target in a single stitch. (I use about 1.7)
- Slow down – if your machine has a speed setting, turn it down. Otherwise, be gentle with the pedal.
- Get to know your reverse button. On computerized machines, you might have to press reverse when the needle is down, or your machine might finish one more stitch before reversing.
So now that everything is set, let’s walk through the process of stitching a seam that will be a Y-seam at both ends.
- Put the needle down in your start point.
- Sew 2 stitches forward, backstitch 2 stitches.
- Sew the length of your seam, slowing down for the last 1/2″.
- Take your stitches 1 at a time. Stop when your needle is in your stopping point.
- Backstitch a couple of stitches.
How about a demonstration?
In my video, I also moved my seam allowances aside to enable me to twirl them, but this isn’t always necessary. Check your pattern.
This post is part of the Back to School Blog Hop will be back for 2019! Please check out these other posts full of tips, tricks, and techniques that will make your quilting and sewing projects a little easier!

Day 1 – September 1 – Sam Hunter: Sewing Long Seams Without Stretching – huntersdesignstudio.com
Day 2 – September 2 – Susan Arnold – Joining Binding the Easy Way – quiltfabrication.com
Day 3 – September 3 – Angie Wilson – Fussy cutting tips and techniques – www.gnomeangel.com
Day 4 – September 4 – Andi Stanfield – No-Mark HST: Let your machine be your guide – truebluequilts.com/blog/
Day 5 – September 5 – Bobbie Gentili – Say YES to Y-seams – geekybobbin.com
Day 6 – September 6 – Mel Beach – 5 Reasons to Say Woo Hoo! to School Glue – pieceloveandhappiness.blogspot.com
Day 7 – September 7 – Laura Piland – 7 Ways to Use a Laser on Your Sewing Machine – www.sliceofpiquilts.com
Day 8 – September 8 – Suzy Webster – How to solve loops in free motion quilting – www.websterquilt.com
Day 9 – September 9 – Tara Miller – Accurate Stitch-and-Flip Corners – quiltdistrict.com
Day 10 – September 10 – Latifah Saafir – Accurate Seams Using Masking Tape! – latifahsaafirstudios.com
Day 11 – September 11 – Sarah Ruiz – The Magic of Glue Basting – saroy.net
Day 12 – September 12 – Jen Shaffer – Ways to stop your ruler from slipping while cutting – patternsbyjen.blogspot.com
Day 13 – September 13 – Cheryl Sleboda – Basics of ruching (a vintage fabric manipulation technique) – muppin.com
Day 14 – September 14 – Raylee Bielenberg – Choosing quilting designs for your quilt – www.sunflowerstitcheries.com
Day 15 – September 15 – Jen Strauser – Accurate and Attractive Machine binding – dizzyquilter.com
Day 16 – September 16 – Jane Davidson – Matching points for all types of intersections – quiltjane.com
Day 17 – September 17 – Teresa Coates – Starch and starch alternatives – teresacoates.com
Day 18 – September 18 – Jen Frost – Benefits of spray basting – faithandfabricdesign.com
Day 19 – September 19 – Sandra Starley – Getting started with Hand Quilting – utahquiltappraiser.blogspot.com
Day 20 – September 20 – Karen Platt – Drunkard’s Path Made Easy – karenplatt.co.uk/blog/
Day 21 – September 21 – Kris Driessen – All Kinds of Square (in a Square) – scrapdash.com
Day 22 – September 22 – Sarah Goer – Planned Improv Piecing – sarahgoerquilts.com
Day 23 – September 23 – Kathy Bruckman – Organizing kits for on-the-go sewing – kathyskwiltsandmore.blogspot.com
Day 24 – September 24 – Cheryl Daines Brown – The Secret to Flat Quilt Tops: Borders – quilterchic.com
Day 25 – September 25 – Cherry Guidry – Pre-assembling fusible applique – cherryblossomsquilting.com
Day 26 – September 26 – Laura Chaney – Getting started with English Paper Piecing – prairiesewnstudios.com
Day 27 – September 27 – Ebony Love – Cutting Bias Strips from a Rectangle – lovebugstudios.com
Day 28 – September 28 – Tammy Silvers – Working with heavier weight threads in your machine – tamarinis.typepad.com
Day 29 – September 29 – Kathy Nutley – Create a perfect facing or frame with 90 degree angles – quiltingsbykathy.com
Day 30 – September 3 – Joanne Harris – Using Leaders and Enders – quiltsbyjoanne.blogspot.com

Fantastic tutorial!
A great post – thank you!
I haven’t done a lot with Y seams but I am not afraid of them. However my “aha” moment with this post was the back stitching. It makes so much sense since we will be tugging on these seams a little when we sew the other seam in. Now I am looking for a project using Y seams.
I have a question as to the size of this pattern. Are there measurements for a queen?
Hi Becky, the pattern includes instructions and fabric requirements for Throw, Crib, and Mini sizes. Based on the dimensions, I think combining 4 crib sizes would give you a queen, or you could make a Throw size and add borders. You can find all the details at https://geekybobbin.com/intersectional